Generating leads is one of the most important activities a company needs to undertake, and get right. Cold outreach - whether sending emails, LinkedIn messages or cold calls - is still one of the most effective methods of reaching prospects if you’re in B2B. If you’re engaged in cold outreach, you’ll likely have a sales team (even if that’s just one person) who spends their days searching for, qualifying and enriching a database (be that a CRM or otherwise) of potential customers that could be contacted.
One of the big challenges in outreach is ensuring the quality and consistency of such databases. Get it wrong and you’ll be sending out messages to people who don’t exist, or damaging your business’s reputation by sending messages to people who are irrelevant for your product or service. You also need to be constantly refreshing it, topping it up with new prospects, and segmenting based on specific signals that can guide your approach.
Thankfully, there are many services out there that can help you find and build lists of prospects: LinkedIn Sales Navigator, Crunchbase, Apollo to name a handful. The problem with these services is that the lists aren’t especially accurate, and you still have to spend time go through each prospect to make sure they are actually accurate and fit your desired customer profile. This usually involves visiting the company website to establish if it’s a) actually online and b) is actually relevant to you. This takes considerable time.
Thankfully, this can be automated. Here is a complete step by step.
What we’re building: an automatic prospect qualification tool
The general idea of our automation flow is as follows:
- Upload a list of URLs to validate. These can come from any source from the options mentioned earlier.
- Use a web scraper to do a deep dive on each website to grab as much useful context as possible.
- Use AI to assess this information and do the qualification.
- Assemble the results into a CSV for download, filtering and integration back into our main database.
Once this is set up, we will be able to add as many URLs as you want into it and just leave it to do its analysis in the background while you get on with other things.
Prerequisites
The only thing you will need is a list of websites you want to analyze, and a short one-line description of your ideal target customer.
If you have a CSV, simply copy the entire column containing the URLs. You’ll be able to merge the CSV our tool produces with your list easily later on.
Tools
You will need access to the following tools to set this up:
- Relevance AI: this is where we will build the main workflow.
- Apify: we will use their website crawler agent to collect data from prospects’ websites. You can use RelevanceAI’s built-in one too, though it’s more expensive.
- OpenAI: we will use Open AI’s GPT 4 model to do the assessment. Again, you are welcome to just use Relevance AI’s built-in models, but it will be more expensive.
- Supabase: we will use this for storing the final CSV. It’s much easier and cheaper to work with than the likes of Google Cloud Platform or Amazon S3.
There are costs involved with all of these tools, and the exact amount will depend on how many URLs you plan to process. As a rough estimate, it should cost between $0.05 - $0.10 per website to run.
A note on time: each website takes roughly a minute to process, which is largely due to the crawler. In our setup, we are collecting data from multiple pages on the website, not just the homepage. This makes it more accurate in its assessment but at the cost of time to complete the crawl. As such, if you’re planning on doing a large list of 1000 or more URLs, expect it to take the best part of a day to complete.
Step 1: Preparation
Before we start build our flow, we need to prepare our API keys and set up Supabase to store the CSV. The first part is easy, so we’ll start there.
Prepare your API keys
You’ll need the following API keys:
- OpenAI API: the best way to do this is to create a project and create an API key for that project. This way you can monitor the usage of your API in isolation. To create an API key, go to this page: https://platform.openai.com/api-keys and generate a new secret key:
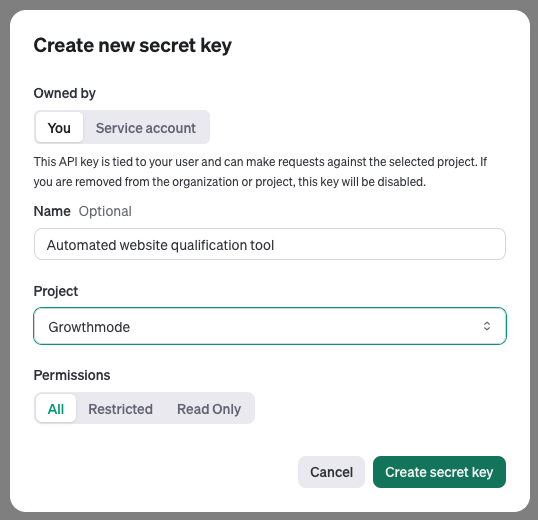
- Once generated, copy the key and paste it into a secure document (I usually use Apple Notes for this) so you can retrieve it later when needed.
- Apify API key: go to Settings and then choose the API & Integrations tab. Click Add New Token and copy the default Personal API token (if you don’t see one, you can create a new token instead)

- Paste this into your temporary document as well.
Set up Supabase
We’ll use Supabase buckets to store our CSV files. Here’s a step by step of how to set this up.
- Open Supabase and click New project.
- In the New project window, give your project a name and enter a password for the database (you won’t be needing this for this project, but you might decide to extend this project later so store your password somewhere safe anyway). Keep the Compute Size and Region settings as the defaults.
- Wait for the new project to deploy, which can take a couple of minutes.
- Once it’s ready, navigate to the Storage tab and click New bucket.
- Give the bucket a name, bearing in mind it only accepts letters, numbers, dots and hyphens.
- Toggle the Public bucket switch to “on”. Try not to be alarmed by the yellow warning box, it’s just there to look out for you.
- Click Save to create the bucket.
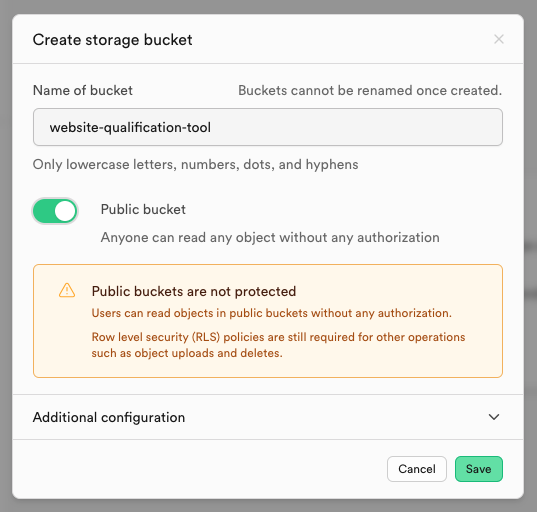
- Next, click the Settings tab and then go to the API page. From this page you’ll need two things:
- The project URL, which will look something like https://whusizxmaqjyeobceytf.supabase.co
- The
anonpublicProject API key and paste this into your temporary document.
- Grab both of these values and paste them into your temporary document.
- Finally, go back to the Storage page and click on Policies.
- Click to create a new policy and fill it in like the screenshot below:
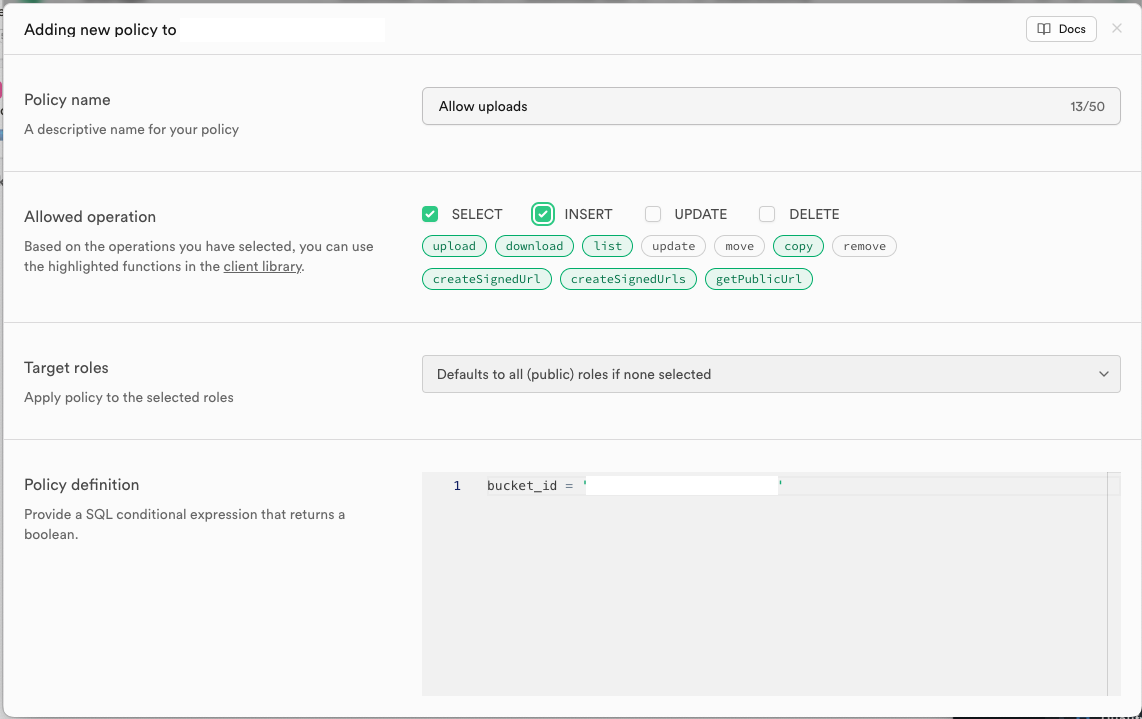
- Click Review and then Save Policy.
You’re now ready to start building the flow.
Step 2: building the flow
Our weapon of choice for building out the flow is Relevance AI. You could also build this with Make.com or Zapier, but I like Relevance AI’s simplicity and the fact it can integrate into an agentic workforce is a big bonus if you want to create fully autonomous SDRs at some point later on. Besides, we’re going to be using quite a lot of custom code.
The full flow contains 11 steps:
- User inputs: the data we need to collect from the user including the list of URLs
- Split text: takes the list of URLs provided and breaks them into an array of variables
- Validate list of URLs: checks that all of the provided URLs are correctly formatted
- Check website is online: pings each URL to ensure it’s actually online
- Scrape using Apify: calls the website scraper in Apify and starts the scraping process
- LLM: analyzes the scraped content from the website
- Simplify the result: transforms the LLM’s output into a cleaner, usable object
- Convert to CSV compatible text: creates a text string of comma-delimited values
- Upload to Supabase: creates the CSV binary and uploads it to your bucket
- Email the results: sends an email with a link to the CSV
Seems quite a lot, but don’t worry, all you’ll be doing is copying, pasting and replacing certain values.
So, log in to Relevance AI and go to Tools, then click New Tool.
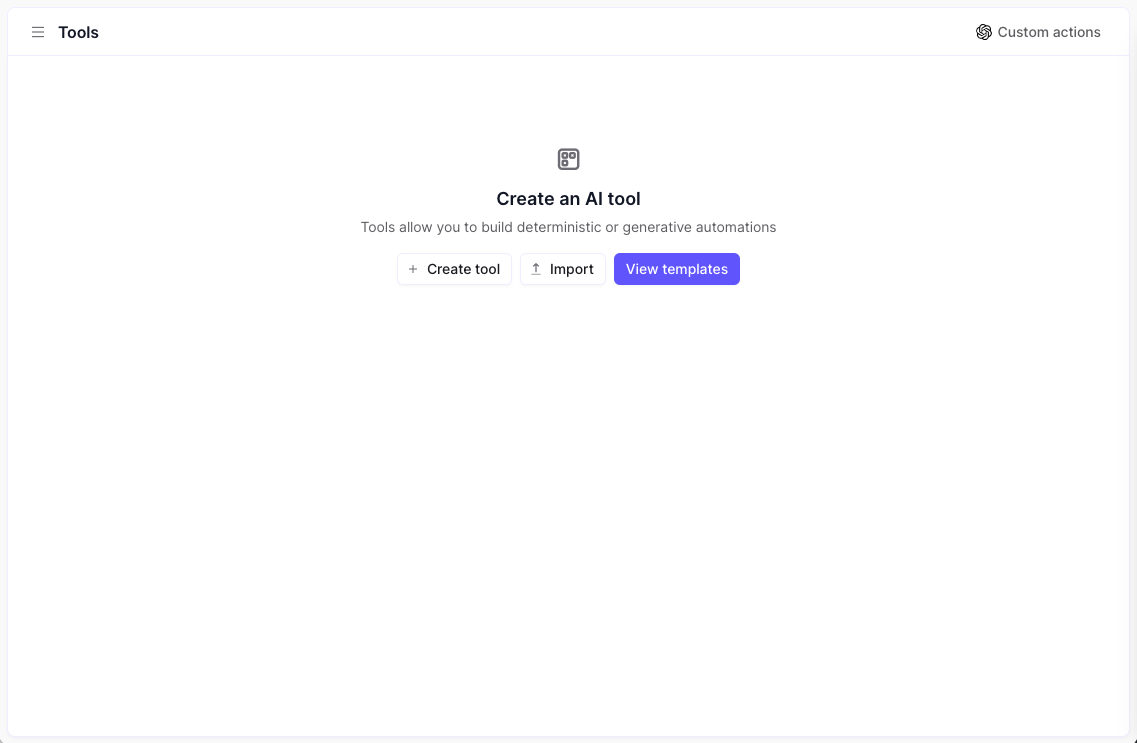
Click Create tool on the next page. You’ll be presented with a page like this:
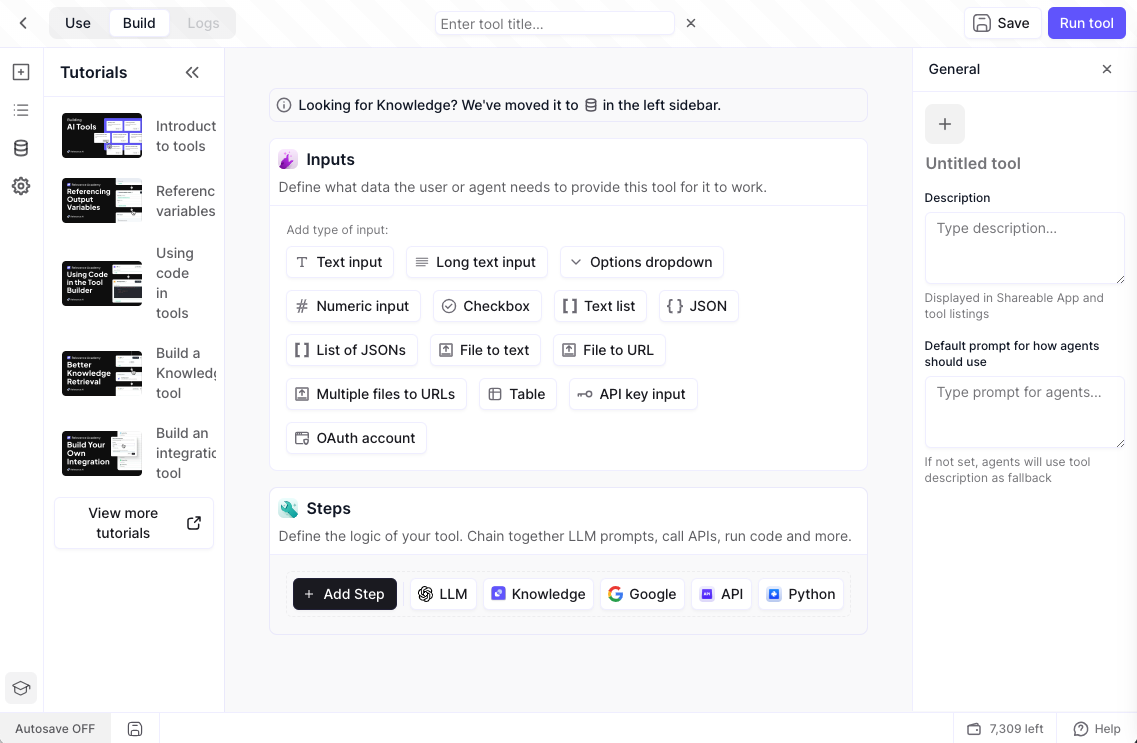
Now let’s start building the steps, starting with the inputs.
Step 1: Inputs
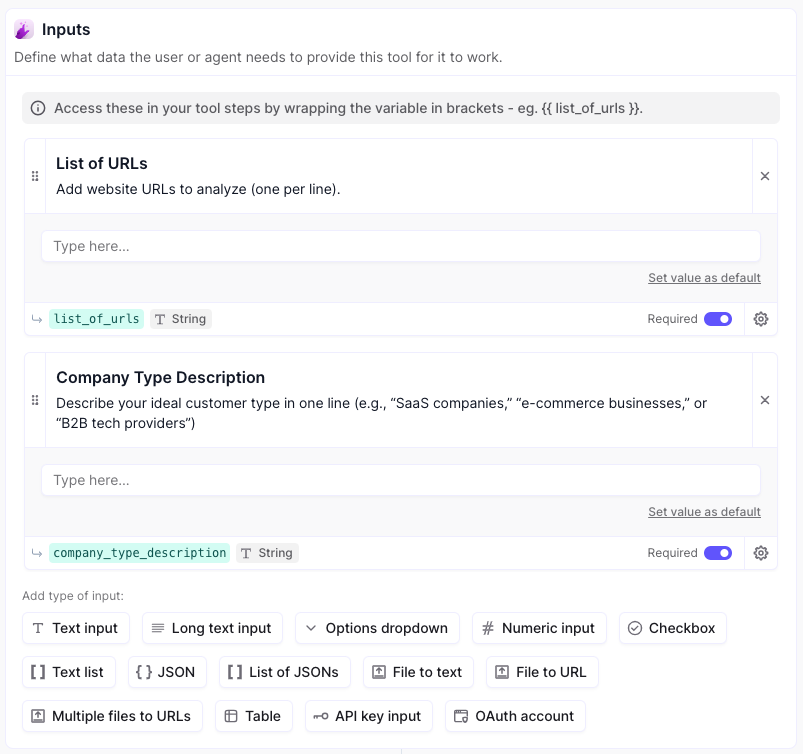
Pay attention to the variables in green. These are the names of the variables that get sent through to the subsequent steps in the flow, so their naming is very important. Click on each to rename it as per the screenshot.
I will add the name of the variable to the beginning of each step below.
Step 2: Split text
Variable name: array_of_urls
Click Add step and search for Split text. Configure this step as follows:
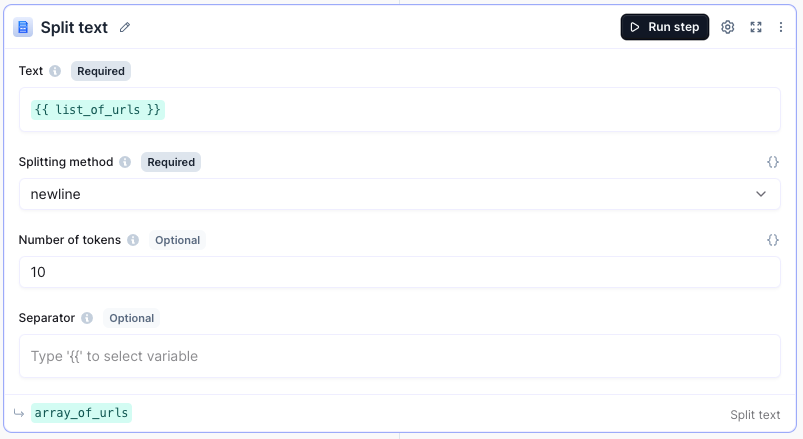
Step 3: Validate list of URLs
Variable name: url_validation
Add a Javascript step and paste in the code below:
const urls = steps.array_of_urls.output.chunks;
const max_urls = 5;
// Test 1: check number of URLs provided
if (urls.length > max_urls) {
  const excess_number = urls.length - max_urls;
  throw new Error(
    `Too many URLs, the maximum allowed is ${max_urls}. Please remove ${excess_number} URL${
      excess_number > 1 ? "s" : ""
    } from your list.`
  );
}
It should look like this:
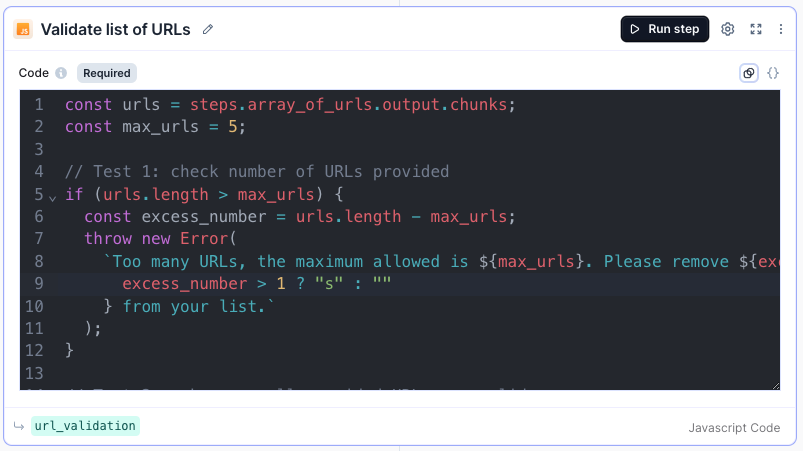
Step 4: Check website is online
Variable name: website_status_check
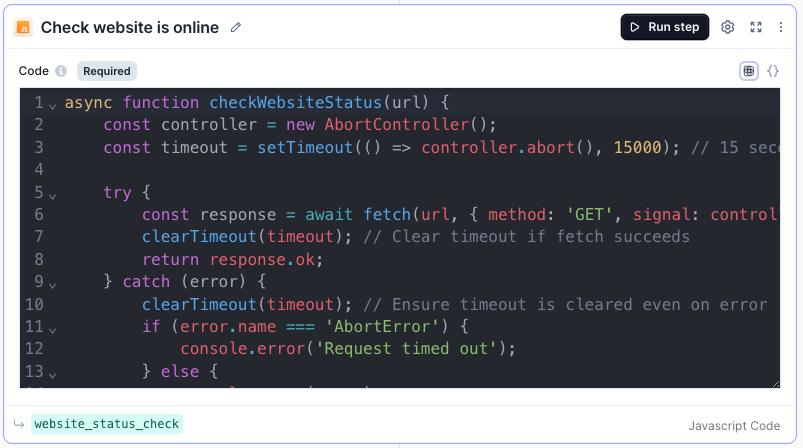
Add another Javascript step and enter this code:
async function checkWebsiteStatus(url) {
    const controller = new AbortController();
    const timeout = setTimeout(() => controller.abort(), 15000); // 15 seconds timeout
    try {
        const response = await fetch(url, { method: 'GET', signal: controller.signal }); // Removed 'no-cors'
        clearTimeout(timeout); // Clear timeout if fetch succeeds
        return response.ok;
    } catch (error) {
        clearTimeout(timeout); // Ensure timeout is cleared even on error
        if (error.name === 'AbortError') {
            console.error('Request timed out');
        } else {
            console.error(error);
        }
        return false;
    }
}
async function processWebsites(urls_array) {
    const websites_checked = [];
    for (const website_url of urls_array) {
        console.log("Checking " + website_url);
        const websiteStatus = await checkWebsiteStatus(website_url);
        websites_checked.push({ "website_url": website_url, "online": websiteStatus });
    }
    return websites_checked;
}
// Main function
const urls_array = steps.array_of_urls.output.chunks;
const websites_checked = await processWebsites(urls_array);
return { "params": params, "steps": steps, "websites_checked": websites_checked };
Step 5: Scrape using Apify
Variable name: scrape_website
Add another Javascript step with the following code:
const apify_api_key = "XXXXXXXXX";
async function runApifyEndpoint(url, wordLimit = 1000) {
    const endpoint = `https://api.apify.com/v2/acts/apify~website-content-crawler/run-sync-get-dataset-items?token=${apify_api_key}`;
    const payload = {
        "aggressivePrune": false,
        "clickElementsCssSelector": "[aria-expanded=\"false\"]",
        "clientSideMinChangePercentage": 15,
        "crawlerType": "playwright:adaptive",
        "debugLog": false,
        "debugMode": false,
        "expandIframes": false,
        "htmlTransformer": "readableTextIfPossible",
        "ignoreCanonicalUrl": false,
        "keepUrlFragments": false,
        "maxCrawlDepth": 1,
        "maxCrawlPages": 5,
        "proxyConfiguration": {
            "useApifyProxy": true
        },
        "readableTextCharThreshold": 100,
        "removeCookieWarnings": true,
        "removeElementsCssSelector": "nav, footer, style, script, noscript, svg,\n[role=\"alert\"],\n[role=\"banner\"],\n[role=\"dialog\"],\n[role=\"alertdialog\"],\n[role=\"region\"][aria-label*=\"skip\" i],\n[aria-modal=\"true\"]",
        "renderingTypeDetectionPercentage": 10,
        "saveFiles": false,
        "saveHtml": false,
        "saveHtmlAsFile": false,
        "saveMarkdown": true,
        "saveScreenshots": false,
        "startUrls": [
            {
                "url": url,
                "method": "GET"
            }
        ],
        "useSitemaps": false
    };
    let result = "";
    try {
        const response = await fetch(endpoint, {
            method: "POST",
            headers: {
                "Content-Type": "application/json"
            },
            body: JSON.stringify(payload)
        });
        if (response.ok) {
            const resp = await response.json();
            // Loop through and combine texts into one big text
            let concatenated_texts = "";
            let word_count = 0;
            for (const r of resp) {
                const text = r.text || "";
                const current_word_count = text.split(/\s+/).length; // Count words in the current text
                if (word_count + current_word_count > wordLimit) {
                    // Add only as many words as needed to reach the word limit
                    const words_to_add = wordLimit - word_count;
                    const truncated_text = text.split(/\s+/).slice(0, words_to_add).join(" ");
                    concatenated_texts += " || " + truncated_text;
                    break;
                } else {
                    concatenated_texts += " || " + text;
                    word_count += current_word_count;
                }
            }
            result = concatenated_texts;
        }
    } catch (error) {
        console.error("Error running Apify endpoint:", error);
    }
    return result;
}
const websites = steps.website_status_check.output.transformed.websites_checked;
const wordLimit = 1000; // Define the word limit here
const websites_scraped = [];
for (const website of websites) {
    if (website.online) {
        const scrape = await runApifyEndpoint(website.website_url, wordLimit);
        websites_scraped.push({ "website_url": website.website_url, "website_content": scrape });
    } else {
        websites_scraped.push({ "website_url": website.website_url, "website_content": "" });
    }
}
console.log(websites_scraped);
// Make sure you include a return statement
return { "scraped_output": websites_scraped };
Change the apify_api_key on the first line to your actual Apify API key.
Step 6: LLM
Variable name: llm_output
Add an LLM step and choose OpenAI’s GPT 4o as your model.
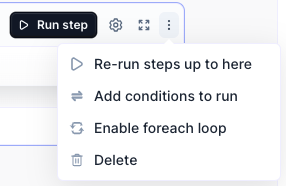
Click the three dots at the top right and select Enable foreach loop:
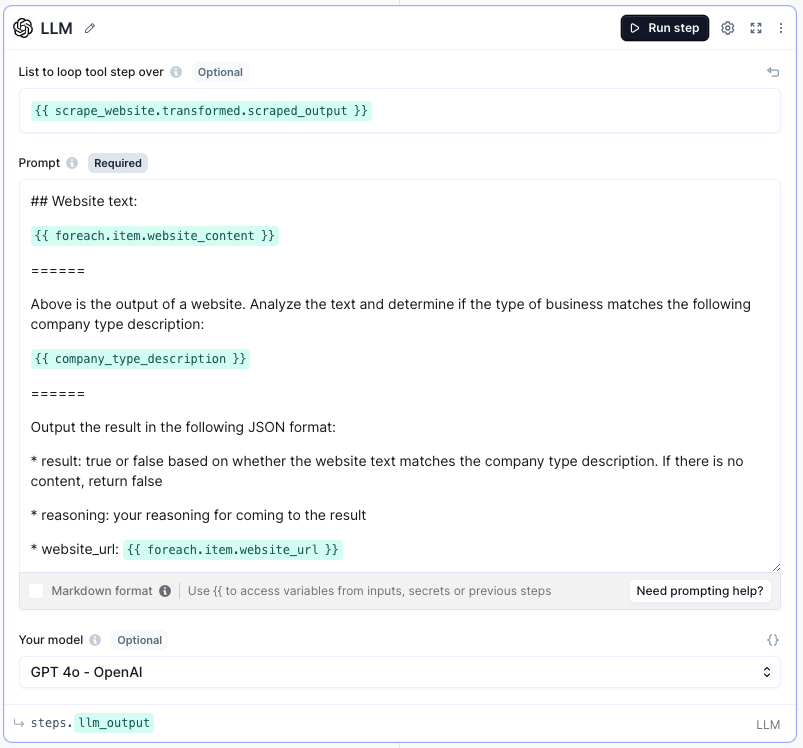
Next, configure the step as follows:
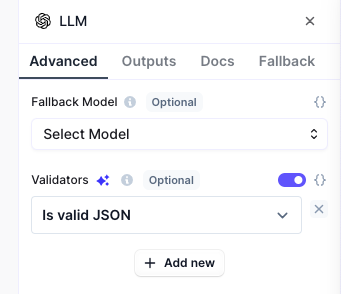
Open the step settings by clicking the cog icon at the top right and set the Validators to Is valid JSON:
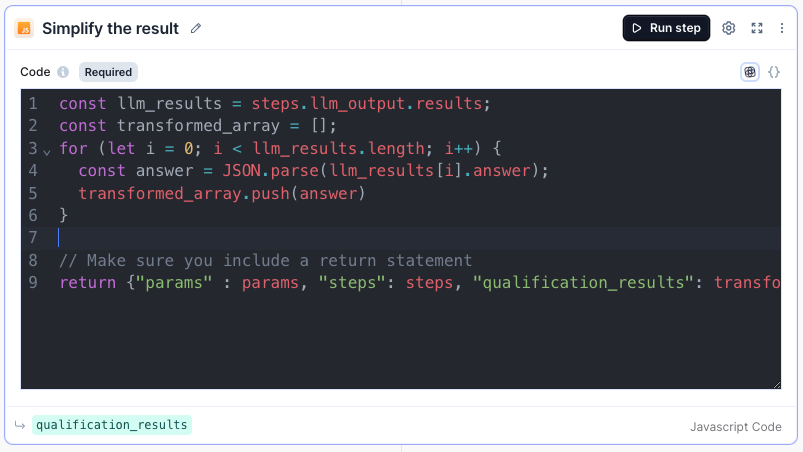
Step 7: Simplify the result
Variable name: qualification_results
Add another Javascript step and add the following code:
const llm_results = steps.llm_output.results;
const transformed_array = [];
for (let i = 0; i < llm_results.length; i++) {
  const answer = JSON.parse(llm_results[i].answer);
  transformed_array.push(answer)
}
// Make sure you include a return statement
return {"params" : params, "steps": steps, "qualification_results": transformed_array };
Step 8: Convert to CSV compatible text
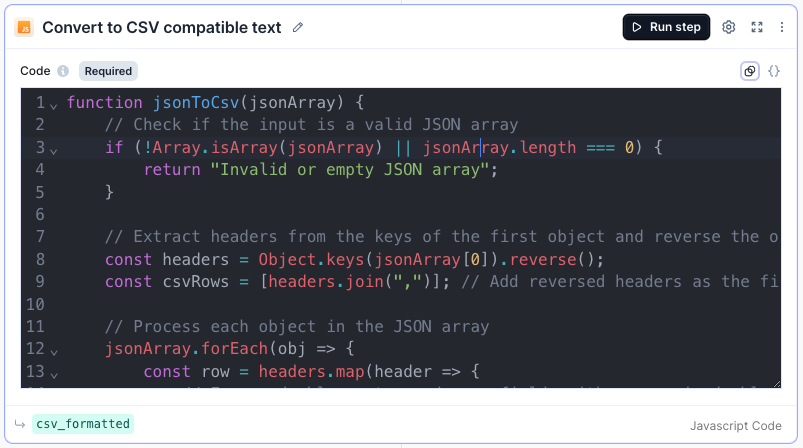
Variable name: csv_formatted
Another Javascript step, with the following code:
function jsonToCsv(jsonArray) {
    // Check if the input is a valid JSON array
    if (!Array.isArray(jsonArray) || jsonArray.length === 0) {
        return "Invalid or empty JSON array";
    }
    // Extract headers from the keys of the first object and reverse the order
    const headers = Object.keys(jsonArray[0]).reverse();
    const csvRows = [headers.join(",")]; // Add reversed headers as the first row
    // Process each object in the JSON array
    jsonArray.forEach(obj => {
        const row = headers.map(header => {
            // Escape double quotes and wrap fields with commas in double quotes
            const value = obj[header] === null || obj[header] === undefined ? "" : obj[header];
            return `"${String(value).replace(/"/g, '""')}"`;
        }).join(",");
        csvRows.push(row);
    });
    // Combine rows into a single CSV string
    return csvRows.join("\n");
}
// Example usage
const jsonArray = steps.qualification_results.output.transformed.qualification_results;
const converted_text = jsonToCsv(jsonArray);
// Make sure you include a return statement
return {"params" : params, "steps": steps, "csv_formatted": converted_text};
Step 9: Upload to Supabase
Variable name: supabase_upload
Guess what, it’s another Javascript step! This time you’ll need your Supabase key and the following code:
const uploadFileToSupabase = async () => {
  const fileName = file_${Date.now()}.csv; // Dynamically generated file name
  const csvContent = steps.csv_formatted.output.transformed.csv_formatted; // Example CSV content
  const bucketName = "YOUR_BUCKET_NAME";
  const filePath = website-qualification/${fileName};
  const supabaseUrl = "YOUR_SUPABASE_URL";
  const supabaseKey =
    "YOUR_SUPABASE_KEY";
  // Create a Blob from the CSV content
  const file = new Blob([csvContent], { type: "text/csv" });
  try {
    const response = await fetch(${supabaseUrl}/storage/v1/object/${bucketName}/${filePath}, {
      method: "POST",
      headers: {
        apikey: supabaseKey,
        Authorization: Bearer ${supabaseKey},
        "Content-Type": file.type, // Use the file's MIME type
      },
      body: file, // Binary data of the file
    });
    if (response.ok) {
      const result = await response.json();
      console.log("File uploaded successfully:", result);
      return result;
    } else {
      console.error("Failed to upload file:", response.statusText);
    }
  } catch (error) {
    console.error("Error uploading file:", error);
  }
};
// Call the upload function and return the required workflow structure
const response = await uploadFileToSupabase();
let file_url = "";
if (response) {
  console.log("File uploaded successfully:", response);
  file_url = `${supabaseUrl}/storage/v1/object/${response.Key}`;
} else {
  console.error("Failed to upload file");
}
return { params, steps, file_url };
Replace YOUR_BUCKET_NAME, YOUR_SUPABASE_URL and YOUR_SUPABASE_KEY with the values you copied earlier.
Step 10: Email the results
This step is technically optional, as you could also just leave the tool running and it will display the CSV link at the end, but given how long this is likely to take, I highly recommend setting up an email step (or, alternatively, a Slack step to send a message when it’s finished, with the CSV link).
To set up an email step, you first need to connect your email account in Relevance. To do that, head back to the main Relevance dashboard and click Integrations from the left hand nav menu. From there, choose your email provider and connect the account before returning to your tool.
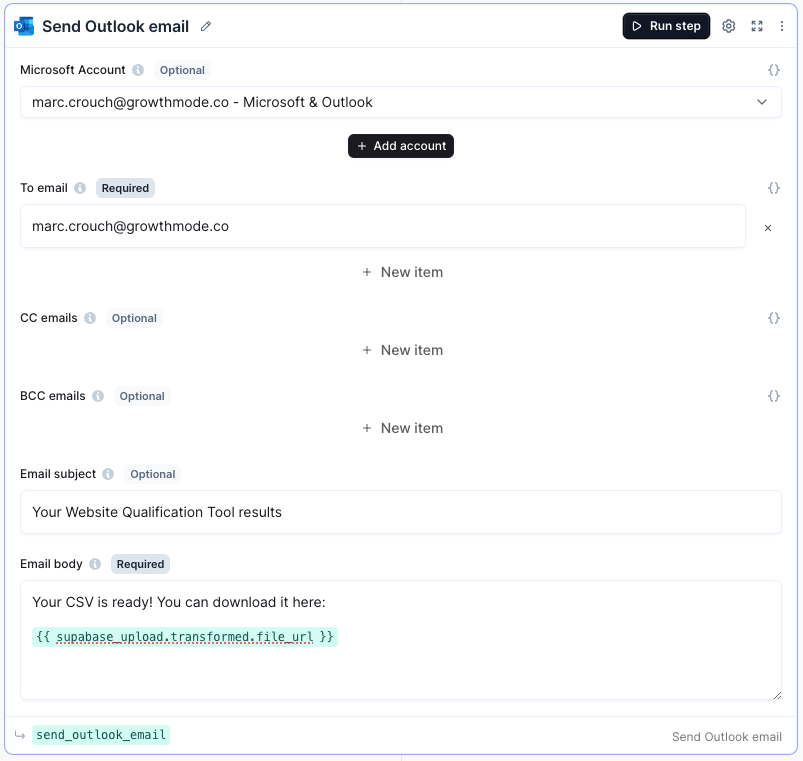
Once ready, add a new step and search for Email. Select your email provider (in our case it’s Outlook), and set it up as follows, replacing my email address with yours of course:
Now save the flow, and it’s ready to use!
Using the tool
At the top left of your tool edit page you’ll see three tabs labelled Use, Build, and Logs. Click the Use option.
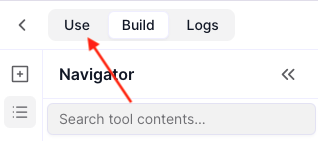
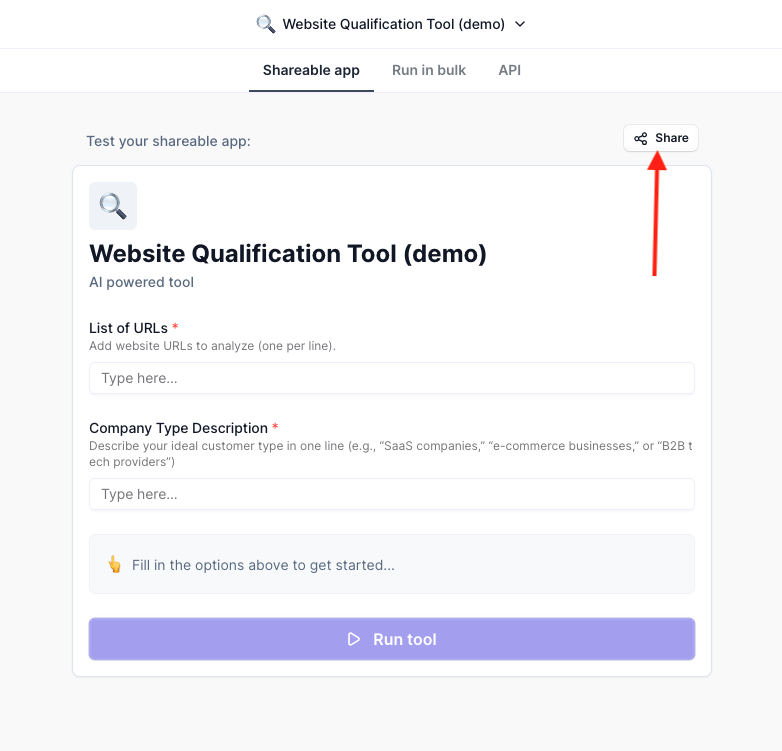
This will open the interface screen for your tool. You can then click the Share button to get a shareable link for people to access it:
On the next screen, select “Shareable link” on the left hand side and click the Publicly available toggle. It should look something like this:
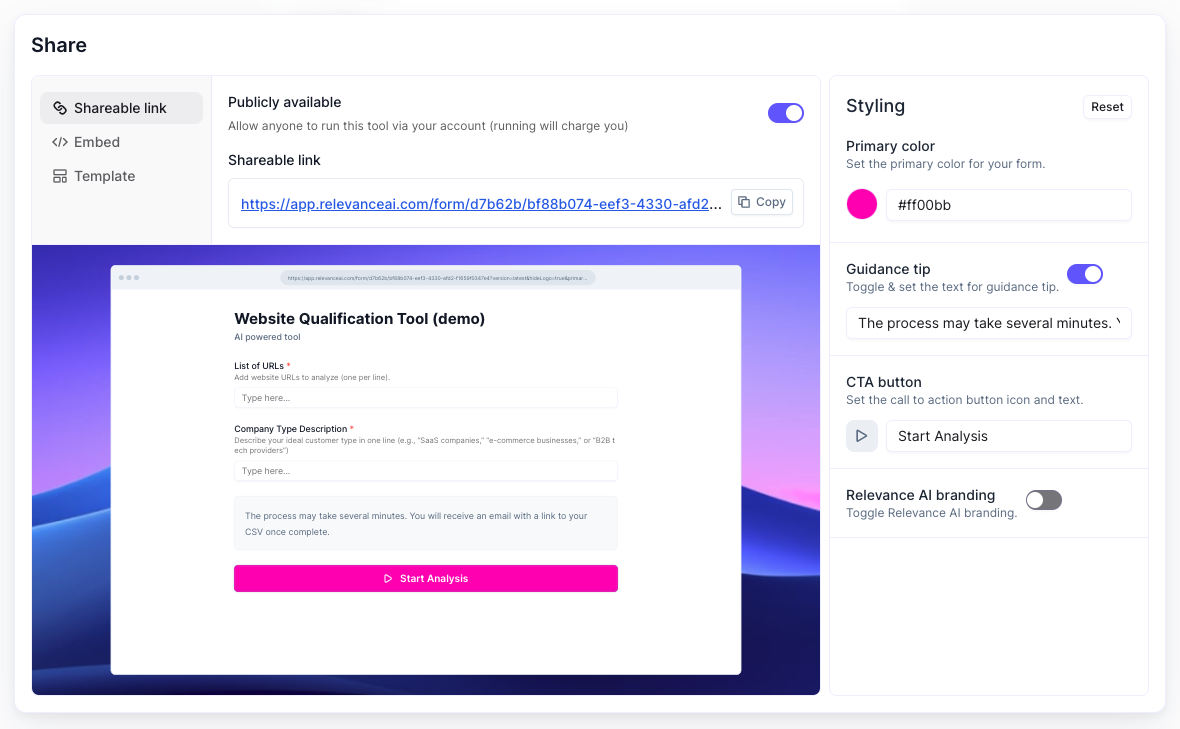
You can then use the shareable link to access the tool whenever you want to use it.
Conclusion
So, lots of steps and copy/pasting of javascript, but what have we built? In short: a tool that can help you qualify lists of prospects automatically, allowing you to significantly improve the quality and relevance of your lists before you start the outreach, while saving you hours of time and resources. Just run this overnight when you leave the office and the qualified CSV will be ready in the morning.
Want to test it out first before building? Try our demo version of the tool at the following link: https://growthmode.co/tools/website-qualification-tool.
You can also reach out if you need help building this, or other automation tools, for your business: https://growthmode.co/contact.

